StereoDepth
如何放置
Python
Python
1pipeline = dai.Pipeline()
2stereo = pipeline.create(dai.node.StereoDepth)输入和输出
debugDispLrCheckIt1、debugDispLrCheckIt2、debugExtDispLrCheckIt1、debugExtDispLrCheckIt2、debugDispCostDump 和 置信度图。StereoDepth 节点内部框图
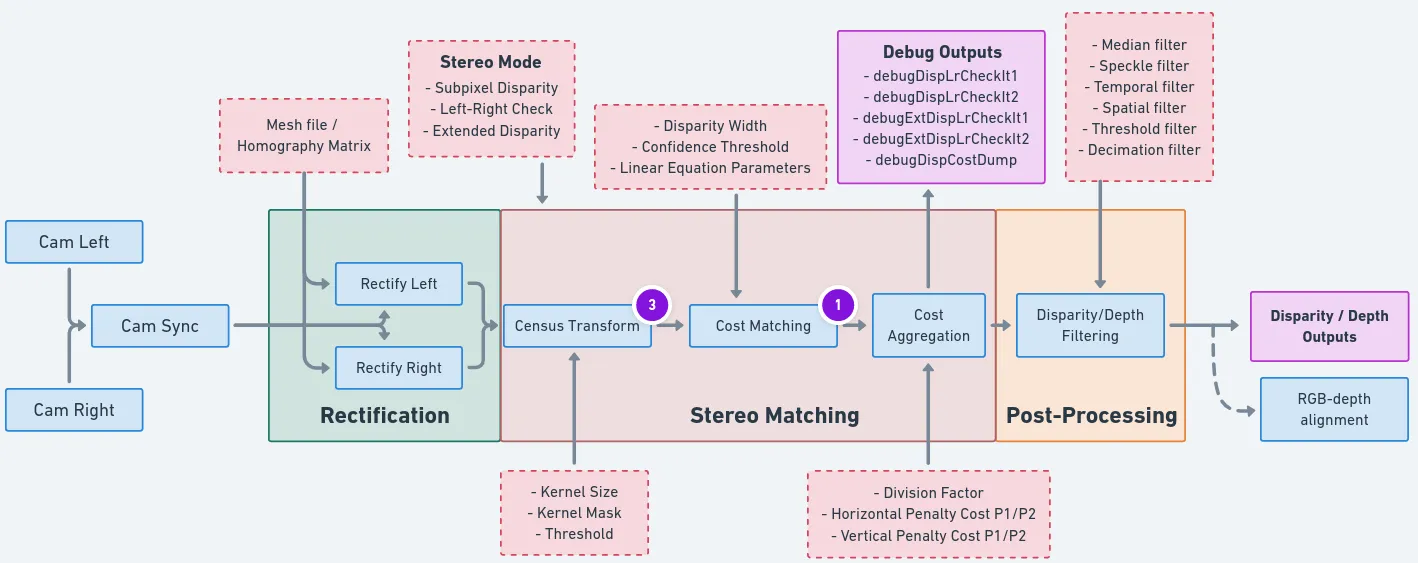
当前可配置模块
- 立体模式:
- 左右校验:
- 左右校验(LR-Check)用于移除因物体边界遮挡(左右相机视图略有不同)导致的错误视差像素。
- 通过 R->L 方向匹配计算视差。
- 通过 L->R 方向匹配计算视差。
- 结合步骤 1 和 2 的结果,在 Shave 上运行:每个像素 d = disparity_LR(x,y) 与 disparity_RL(x-d,y) 比较。如果差值超过阈值,则最终视差图中 (x,y) 处的像素失效。
- 您可以使用
debugDispLrCheckIt1和debugDispLrCheckIt2调试输出进行调试/微调。
- 左右校验(LR-Check)用于移除因物体边界遮挡(左右相机视图略有不同)导致的错误视差像素。
- 扩展视差:
- 扩展视差模式允许检测给定基线下的更近距离物体。这会将最大视差搜索范围从 96 增加到 191,即范围为 [0..190]。
- 在原始尺寸图像(例如 1280x720)上计算视差。
- 在 2 倍下采样图像(例如 640x360)上计算视差。
- 在 Shave 上结合两级视差,有效覆盖总计 191 像素的视差范围(相对于原始分辨率)。
- 您可以使用
debugExtDispLrCheckIt1和debugExtDispLrCheckIt2调试输出进行调试/微调。
- 扩展视差模式允许检测给定基线下的更近距离物体。这会将最大视差搜索范围从 96 增加到 191,即范围为 [0..190]。
- 亚像素视差:
- 亚像素模式提高了精度,在远距离测量中尤其有用。它还有助于更好地估计表面法线。
- 在此模式下,立体相机执行:94 个深度步长 * 8 个亚像素深度步长 + 2(最小/最大值)= 754 个深度步长。
- 如需比较正常视差与亚像素视差图像,请单击此处。
- 左右校验:
- 深度滤波器:
- 深度滤波 / 深度后处理 在深度管线的末尾执行,有助于降噪并提升整体深度质量。
- 网格文件:
- 网格文件(单应性矩阵)通过相机内参、畸变系数和矫正旋转矩阵生成。这些文件有助于克服相机畸变,提高准确性,并在使用广角镜头时发挥作用。
- 目前,网格文件仅在标定过程中在主机上为立体相机生成。生成的网格文件存储在 depthai/resources 中,用户可以将其加载到设备上。这一过程将在未来的版本中迁移至设备端完成。
- 置信度阈值:
- 置信度阈值:立体深度算法在右摄像头图像中搜索与左图像匹配的特征(沿 96 个视差级别)。过程中,它会计算每个视差级别的代价,并选择两个视差之间的最小代价,进而计算每个像素的置信度。仅当深度置信度低于置信度阈值时,Stereo 节点才会输出视差/深度像素(置信度值越低,深度精度越高)。
- LR 检查阈值:当 LR 和 RL 视差之间的差异小于 LR 检查阈值时,视差才会被纳入输出。
局限性
- 当子像素模式设置为 4 或 5 位时,中值滤波禁用。
- 要实现 RGB-深度对齐,RGB 摄像头必须与立体摄像头对处于同一水平线上。
- 使用视差偏移时,RGB-深度对齐无法工作。
运行时更改相机标定
device.setCalibration() 方法更改,适用于因环境因素导致设备立体质量随时间下降的场景。 相同的数据可通过 device.getCalibration() 获取。深度预设
深度预设
| 特性 | 默认 | 人脸 | 高细节 | 机器人 |
|---|---|---|---|---|
| 基础配置文件 | HIGH_DENSITY | HIGH_DENSITY | HIGH_ACCURACY | HIGH_DENSITY |
| 中值滤波 | 7x7 核 | 关闭 | 关闭 | 7x7 核 |
| 子像素精度 | 3 位 | 5 位 | 5 位 | 3 位 |
| 扩展视差 | 否 | 是 | 是 | 否 |
| 范围 | 0-15 米 | 3 厘米-3 米 | 0-15 米 | 0-10 米 |
| 时间滤波 | 启用 | 启用 | 启用 | 禁用 |
| 用例 | 通用 | 人脸跟踪、生物识别 | 3D 扫描、物体细节 | 导航、障碍物检测 |
- 左右一致性检查
- 2 倍降采样(像素跳跃)
- 斑点滤波(范围:200,阈值:2)
- 3 个用于后处理的硬件资源
立体深度帧率
| 处理 \ 分辨率 | 400P [ms] | 720P [ms] | 800P [ms] |
|---|---|---|---|
| 校正 | 1.5 | 5 | 6 |
| 广视场角校正 | 2.5 | 8 | 9 |
- LR:左右检查(
stereo.setLeftRightCheck())。需要执行 2 次立体匹配操作(L→R 和 R→L 方向),然后合并结果。 - Ext:扩展视差模式(
stereo.setExtendedDisparity())。需要执行 2 次立体匹配操作(原始和降采样),然后合并结果。 - Sub:子像素匹配(
stereo.setSubpixel())。每个像素需要 96 字节的代价图(每个视差级别一个字节),因此对于 800P 帧,约 98MB 的数据需要传输到 CMX 内存(供 SHAVEs 使用)进行子像素计算。此情况下的瓶颈是内存带宽(~4.1GB/秒)。子像素位数不影响延迟。
| 处理过程 \ 分辨率 | 400P [毫秒] | 720P [毫秒] | 800P [毫秒] |
|---|---|---|---|
| 无LR, 无Ext, 无Sub | 3.4 | 7.4 | 8.1 |
| 无LR, 无Ext, Sub | 6.2 | 21.7 | 23.9 |
| 无LR, Ext, 无Sub | 8.5 | 21.5 | 23.5 |
| 无LR, Ext, Sub | 11 | 32.7 | 36.7 |
| LR, 无Ext, 无Sub | 7.4 | 18 | 19.8 |
| LR, 无Ext, Sub | 10.1 | 27.6 | 30.5 |
| LR, Ext, 无Sub | 16.7 | 43.7 | 48.3 |
| LR, Ext, Sub | 20.4 | 56 | 62 |
3x3、5x5、7x7)不影响延迟:| 处理过程 \ 分辨率 | 400P [毫秒] | 720P [毫秒] | 800P [毫秒] |
|---|---|---|---|
中值滤波(3x3 / 5x5 / 7x7) | 0.8 | 1.8 | 1.8 |
使用方法
Python
Python
1pipeline = dai.Pipeline()
2stereo = pipeline.create(dai.node.StereoDepth)
3
4# 更好地处理遮挡:
5stereo.setLeftRightCheck(False)
6# 更近的最小深度,视差范围翻倍:
7stereo.setExtendedDisparity(False)
8# 远距离精度更高,分数视差32级:
9stereo.setSubpixel(False)
10
11# 预先定义并配置MonoCamera节点
12left.out.link(stereo.left)
13right.out.link(stereo.right)功能示例
- 深度预览
- RGB深度对齐 - 将深度图与彩色摄像头对齐(RGB-D)
- 立体深度后处理滤波器
- 单目 & MobilenetSSD & 深度
- RGB & 带有空间数据的MobilenetSSD
参考
class
depthai.node.StereoDepth(depthai.Node)
class
PresetMode
Preset modes for stereo depth. Members: HIGH_ACCURACY : **Deprecated:** Will be removed in future releases and replaced with DEFAULT HIGH_DENSITY : **Deprecated:** Will be removed in future releases and replaced with DEFAULT DEFAULT FACE HIGH_DETAIL ROBOTICS
method
enableDistortionCorrection(self, arg0: bool)Equivalent to useHomographyRectification(!enableDistortionCorrection)
method
getMaxDisparity(self) -> float: floatUseful for normalization of the disparity map. Returns: Maximum disparity value that the node can return
method
loadMeshData(self, dataLeft: collections.abc.Sequence

[


typing.SupportsInt

], dataRight: collections.abc.Sequence

[


typing.SupportsInt

])
Specify mesh calibration data for 'left' and 'right' inputs, as vectors of bytes. Overrides useHomographyRectification behavior. See `loadMeshFiles` for the expected data format
method
loadMeshFiles(self, pathLeft: Path, pathRight: Path)Specify local filesystem paths to the mesh calibration files for 'left' and 'right' inputs. When a mesh calibration is set, it overrides the camera intrinsics/extrinsics matrices. Overrides useHomographyRectification behavior. Mesh format: a sequence of (y,x) points as 'float' with coordinates from the input image to be mapped in the output. The mesh can be subsampled, configured by `setMeshStep`. With a 1280x800 resolution and the default (16,16) step, the required mesh size is: width: 1280 / 16 + 1 = 81 height: 800 / 16 + 1 = 51
method
setAlphaScaling(self, arg0: typing.SupportsFloat)Free scaling parameter between 0 (when all the pixels in the undistorted image are valid) and 1 (when all the source image pixels are retained in the undistorted image). On some high distortion lenses, and/or due to rectification (image rotated) invalid areas may appear even with alpha=0, in these cases alpha < 0.0 helps removing invalid areas. See getOptimalNewCameraMatrix from opencv for more details.
method
setBaseline(self, arg0: typing.SupportsFloat)Override baseline from calibration. Used only in disparity to depth conversion. Units are centimeters.
method
setConfidenceThreshold(self, arg0: typing.SupportsInt)Confidence threshold for disparity calculation Parameter ``confThr``: Confidence threshold value 0..255
method
setDefaultProfilePreset(self, arg0: StereoDepth.PresetMode)Sets a default preset based on specified option. Parameter ``mode``: Stereo depth preset mode
method
method
setDepthAlignmentUseSpecTranslation(self, arg0: bool)Use baseline information for depth alignment from specs (design data) or from calibration. Default: true
method
setDisparityToDepthUseSpecTranslation(self, arg0: bool)Use baseline information for disparity to depth conversion from specs (design data) or from calibration. Default: true
method
setEmptyCalibration(self)Specify that a passthrough/dummy calibration should be used, when input frames are already rectified (e.g. sourced from recordings on the host)
method
setExtendedDisparity(self, enable: bool)Disparity range increased from 0-95 to 0-190, combined from full resolution and downscaled images. Suitable for short range objects. Currently incompatible with sub-pixel disparity
method
setFocalLength(self, arg0: typing.SupportsFloat)Override focal length from calibration. Used only in disparity to depth conversion. Units are pixels.
method
setFocalLengthFromCalibration(self, arg0: bool)Whether to use focal length from calibration intrinsics or calculate based on calibration FOV. Default value is true.
method
method
setLeftRightCheck(self, enable: bool)Computes and combines disparities in both L-R and R-L directions, and combine them. For better occlusion handling, discarding invalid disparity values
method
setMedianFilter(self, arg0: depthai.MedianFilter)Parameter ``median``: Set kernel size for disparity/depth median filtering, or disable
method
setMeshStep(self, width: typing.SupportsInt, height: typing.SupportsInt)Set the distance between mesh points. Default: (16, 16)
method
setNumFramesPool(self, arg0: typing.SupportsInt)Specify number of frames in pool. Parameter ``numFramesPool``: How many frames should the pool have
method
method
setOutputKeepAspectRatio(self, keep: bool)Specifies whether the frames resized by `setOutputSize` should preserve aspect ratio, with potential cropping when enabled. Default `true`
method
method
setOutputSize(self, width: typing.SupportsInt, height: typing.SupportsInt)Specify disparity/depth output resolution size, implemented by scaling. Currently only applicable when aligning to RGB camera
method
setPostProcessingHardwareResources(self, arg0: typing.SupportsInt, arg1: typing.SupportsInt)Specify allocated hardware resources for stereo depth. Suitable only to increase post processing runtime. Parameter ``numShaves``: Number of shaves. Parameter ``numMemorySlices``: Number of memory slices.
method
setRectification(self, enable: bool)Rectify input images or not.
method
setRectificationUseSpecTranslation(self, arg0: bool)Obtain rectification matrices using spec translation (design data) or from calibration in calculations. Should be used only for debugging. Default: false
method
setRectifyEdgeFillColor(self, color: typing.SupportsInt)Fill color for missing data at frame edges Parameter ``color``: Grayscale 0..255, or -1 to replicate pixels
method
setRectifyMirrorFrame(self, arg0: bool)DEPRECATED function. It was removed, since rectified images are not flipped anymore. Mirror rectified frames, only when LR-check mode is disabled. Default `true`. The mirroring is required to have a normal non-mirrored disparity/depth output. A side effect of this option is disparity alignment to the perspective of left or right input: `false`: mapped to left and mirrored, `true`: mapped to right. With LR-check enabled, this option is ignored, none of the outputs are mirrored, and disparity is mapped to right. Parameter ``enable``: True for normal disparity/depth, otherwise mirrored
method
setRuntimeModeSwitch(self, arg0: bool)Enable runtime stereo mode switch, e.g. from standard to LR-check. Note: when enabled resources allocated for worst case to enable switching to any mode.
method
setSubpixel(self, enable: bool)Computes disparity with sub-pixel interpolation (3 fractional bits by default). Suitable for long range. Currently incompatible with extended disparity
method
setSubpixelFractionalBits(self, subpixelFractionalBits: typing.SupportsInt)Number of fractional bits for subpixel mode. Default value: 3. Valid values: 3,4,5. Defines the number of fractional disparities: 2^x. Median filter postprocessing is supported only for 3 fractional bits.
method
useHomographyRectification(self, arg0: bool)Use 3x3 homography matrix for stereo rectification instead of sparse mesh generated on device. Default behaviour is AUTO, for lenses with FOV over 85 degrees sparse mesh is used, otherwise 3x3 homography. If custom mesh data is provided through loadMeshData or loadMeshFiles this option is ignored. Parameter ``useHomographyRectification``: true: 3x3 homography matrix generated from calibration data is used for stereo rectification, can't correct lens distortion. false: sparse mesh is generated on-device from calibration data with mesh step specified with setMeshStep (Default: (16, 16)), can correct lens distortion. Implementation for generating the mesh is same as opencv's initUndistortRectifyMap function. Only the first 8 distortion coefficients are used from calibration data.
property
confidenceMap
Outputs ImgFrame message that carries RAW8 confidence map. Lower values means higher confidence of the calculated disparity value. RGB alignment, left-right check or any postproccessing (e.g. median filter) is not performed on confidence map.
property
debugDispCostDump
Outputs ImgFrame message that carries cost dump of disparity map. Useful for debugging/fine tuning.
property
debugDispLrCheckIt1
Outputs ImgFrame message that carries left-right check first iteration (before combining with second iteration) disparity map. Useful for debugging/fine tuning.
property
debugDispLrCheckIt2
Outputs ImgFrame message that carries left-right check second iteration (before combining with first iteration) disparity map. Useful for debugging/fine tuning.
property
debugExtDispLrCheckIt1
Outputs ImgFrame message that carries extended left-right check first iteration (downscaled frame, before combining with second iteration) disparity map. Useful for debugging/fine tuning.
property
debugExtDispLrCheckIt2
Outputs ImgFrame message that carries extended left-right check second iteration (downscaled frame, before combining with first iteration) disparity map. Useful for debugging/fine tuning.
property
depth
Outputs ImgFrame message that carries RAW16 encoded (0..65535) depth data in depth units (millimeter by default). Non-determined / invalid depth values are set to 0
property
disparity
Outputs ImgFrame message that carries RAW8 / RAW16 encoded disparity data: RAW8 encoded (0..95) for standard mode; RAW8 encoded (0..190) for extended disparity mode; RAW16 encoded for subpixel disparity mode: - 0..760 for 3 fractional bits (by default) - 0..1520 for 4 fractional bits - 0..3040 for 5 fractional bits
property
initialConfig
Initial config to use for StereoDepth.
property
inputConfig
Input StereoDepthConfig message with ability to modify parameters in runtime. Default queue is non-blocking with size 4.
property
left
Input for left ImgFrame of left-right pair Default queue is non-blocking with size 8
property
outConfig
Outputs StereoDepthConfig message that contains current stereo configuration.
property
rectifiedLeft
Outputs ImgFrame message that carries RAW8 encoded (grayscale) rectified frame data.
property
rectifiedRight
Outputs ImgFrame message that carries RAW8 encoded (grayscale) rectified frame data.
property
right
Input for right ImgFrame of left-right pair Default queue is non-blocking with size 8
property
syncedLeft
Passthrough ImgFrame message from 'left' Input.
property
syncedRight
Passthrough ImgFrame message from 'right' Input.
class
depthai.node.StereoDepth.PresetMode
variable
variable
variable
variable
variable
variable
variable
method
method
method
method
method
method
method
method
method
method
property
property
视差
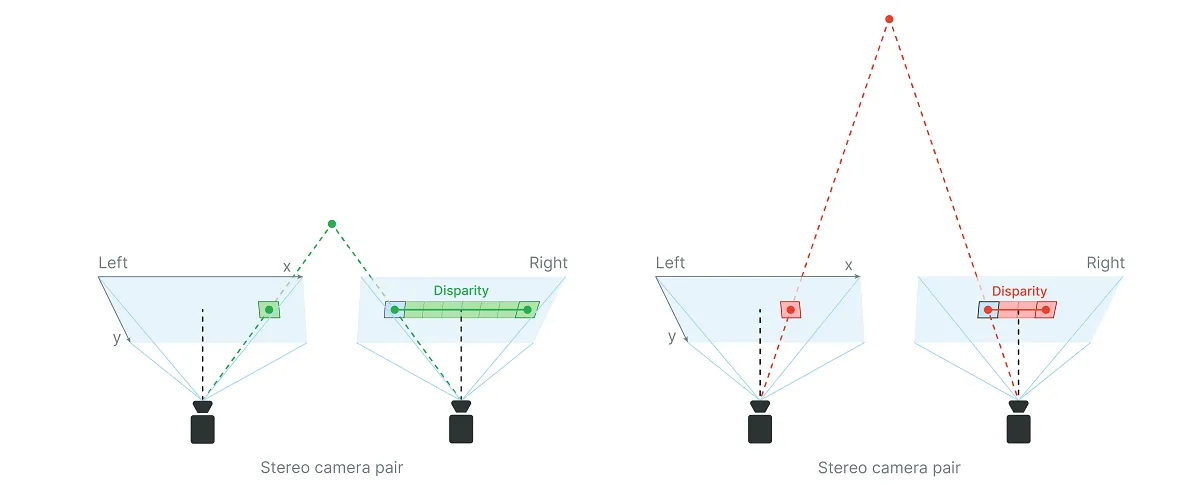
0..255,含义如下:0- 最大置信度,表示值有效255- 最小置信度,值更可能错误
stereo.initialConfig.setConfidenceThreshold() 设置置信度阈值。利用视差图计算深度
Python
1depth = focal_length_in_pixels * baseline / disparity_in_pixelsintrinsics[0][0])写在摄像头内参中。Python
1import depthai as dai
2
3with dai.Device() as device:
4  calibData = device.readCalibration()
5  intrinsics = calibData.getCameraIntrinsics(dai.CameraBoardSocket.CAM_C)
6 print('Right mono camera focal length in pixels:', intrinsics[0][0])Python
1focal_length_in_pixels = image_width_in_pixels * 0.5 / tan(HFOV * 0.5 * PI/180)
2
3# 使用400P单目相机分辨率,HFOV=71.9度
4focal_length_in_pixels = 640 * 0.5 / tan(71.9 * 0.5 * PI / 180) = 441.25
5
6# 使用800P单目相机分辨率,HFOV=71.9度
7focal_length_in_pixels = 1280 * 0.5 / tan(71.9 * 0.5 * PI / 180) = 882.5Python
1# 对于OAK-D @ 400P单目相机,视差例如50像素
2depth = 441.25 * 7.5 / 50 = 66.19 # cm
3
4# 对于OAK-D @ 800P单目相机,视差例如10像素
5depth = 882.5 * 7.5 / 10 = 661.88 # cmuint16存储,其中0是一个特殊值,表示距离未知。最小立体深度距离
Python
1min_distance = focal_length_in_pixels * baseline / disparity_in_pixels = 882.5 * 7.5cm / 95 = 69.67cm- 将分辨率改为640x400,而不是标准的1280x800。
- 启用扩展视差。
Python
1min_distance = focal_length_in_pixels * baseline / disparity_in_pixels = 882.5 * 7.5cm / 190 = 34.84cm同时应用这两个选项是可能的,这会将最小深度设置为标准设置的1/4,但在如此短的距离内,最小深度受到焦距的限制,即19.6cm,因为OAK-D单目相机具有固定的对焦距离:19.6cm - 无穷远。
视差偏移以降低最小深度感知
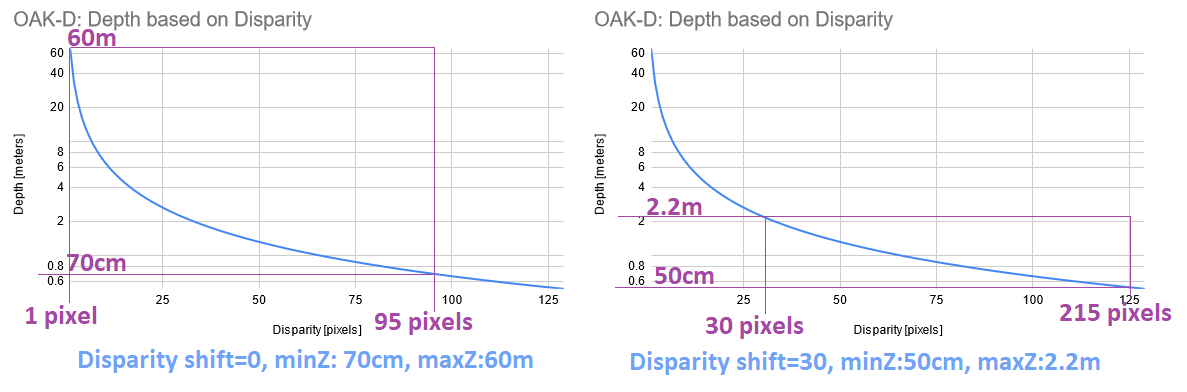
- 由于视差与深度之间的反比关系,随着视差偏移的增加,MaxZ的减小速度将远快于MinZ。因此,建议不要使用超过必要的视差偏移。
- 以这种方式减少MinZ的代价是,距离大于MaxZ的物体将无法被看到。
- 由于上述原因,我们仅建议在已知MaxZ的情况下使用视差偏移,例如将深度摄像头安装在桌子上方并指向桌面。
- 输出的视差图不会扩展,只有深度图会扩展。因此,如果视差偏移设置为50,获取的视差值为90,则实际视差为140。
- (+) 速度更快,因为它不需要额外的计算,这意味着没有额外的延迟
- (-) 会显著降低最大Z值 (MaxZ),而扩展视差只会降低最小Z值 (MinZ)。
method
depthai.StereoDepthConfig.setDisparityShift
最大立体深度距离
Python
1Dm = (baseline/2) * tan((90 - HFOV / HPixels)*pi/180)Python
1# 对于 OAK-D(7.5厘米基线)
2Dm = (7.5/2) * tan((90 - 71.9/1280)*pi/180) = 3825.03厘米 = 38.25米
3
4# 对于 OAK-D-CM4(9厘米基线)
5Dm = (9/2) * tan((90 - 71.9/1280)*pi/180) = 4590.04厘米 = 45.9米深度感知精度
局限性
B。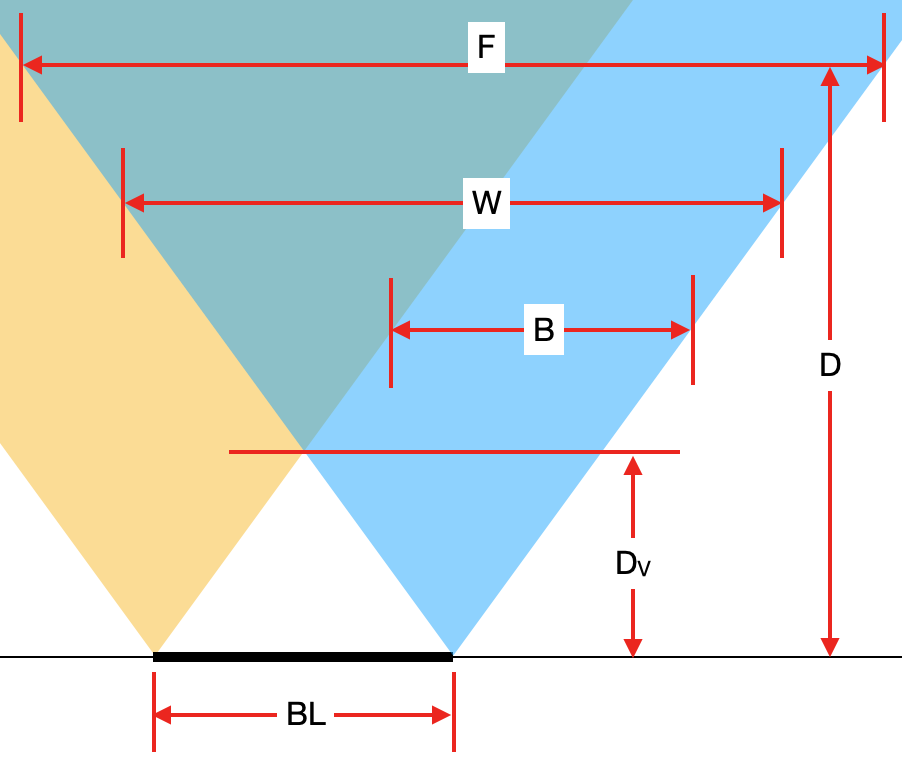
BL [cm]- 立体相机的基线。Dv [cm]- 两个相机都能看到物体的最小距离(即可以计算深度的距离)。B [pixels]- 无法计算深度的条带宽度。W [pixels]- 单色相机的像素宽度或水平像素数,在其他公式中也记作HPixels。D [cm]- 从相机平面到物体的距离(参见图像 测量真实世界物体尺寸)。F [cm]- 在距离D处图像的宽度。
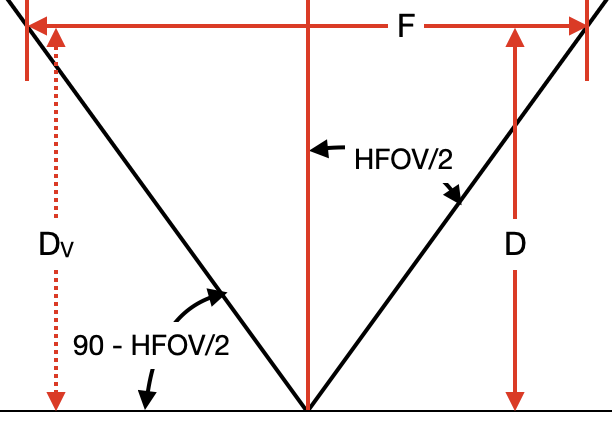
tan 函数,可以得到以下公式:F = 2 * D * tan(HFOV/2)Dv = (BL/2) * tan(90 - HFOV/2)
B,我们可以再次使用 tan 函数(与 F 相同),但这次 还必须乘以 W 与 F 的比值,以便将单位转换为像素。 由此得到以下公式:Python
1B = 2 * Dv * tan(HFOV/2) * W / F
2B = 2 * Dv * tan(HFOV/2) * W / (2 * D * tan(HFOV/2))
3B = W * Dv / D # 像素HFOV 为 72°,基线 (BL) 为 7.5 厘米,并且使用 640x400 (400P) 分辨率,因此 W = 640,物体距离 D = 100 厘米,我们可以 按以下方式计算 B:Command Line
1Dv = 7.5 / 2 * tan(90 - 72/2) = 3.75 * tan(54°) = 5.16 cm
2B = 640 * 5.16 / 100 = 33 # 像素OAK-D-PRO 将同时包含红外点阵投影仪和红外LED,从而实现在无光环境下的运行。红外LED用于照亮整个区域(用于黑白/彩色帧),而红外点阵投影仪主要用于精确的视差匹配——以便在空白表面上也能获得高质量的深度图。在户外,红外激光点阵投影仪仅在夜间相关。有关更多信息,请查看开发进度 这里。
测量真实世界物体尺寸
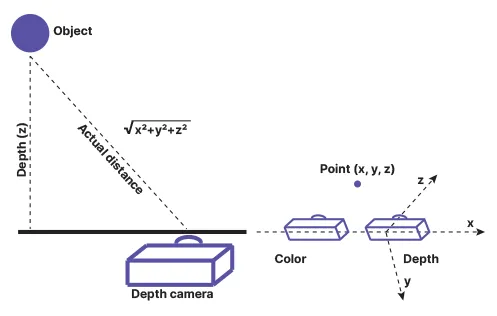
143行之后)从 XYZ 坐标(SpatialImgDetections)计算检测到物体的距离:Python
1distance = math.sqrt(detection.spatialCoordinates.x ** 2 + detection.spatialCoordinates.y ** 2 + detection.spatialCoordinates.z ** 2) # mm需要帮助?
请前往 OAKChina 官网 获取技术支持或解答您的任何疑问。